这一章的主要内容是介绍lua的面向对象,构造函数啊,对象啊,继承啊,链式操作blabla。
lua的特点
脚本语言 :这决定了用lua写出来的程序不象c\c++等需要编译成二进制代码,以可执行文件的形式存在。脚本语言不需要编译,可以直接用,由解释器来负责解释。轻量级 :一个完整的Lua解释器不过200k,在目前所有脚本引擎中,Lua的速度是最快的。这一切都决定了Lua是作为嵌入式脚本的最佳选择。面向对象编程 :这让程序能够更容易的组合,代码更清晰易懂,能使程序之间互相影响的程度降到最低。其他特点 :除此之外还有同时支持面向过程编程和函数式编程,自动内存管理,支持多线程等特点。
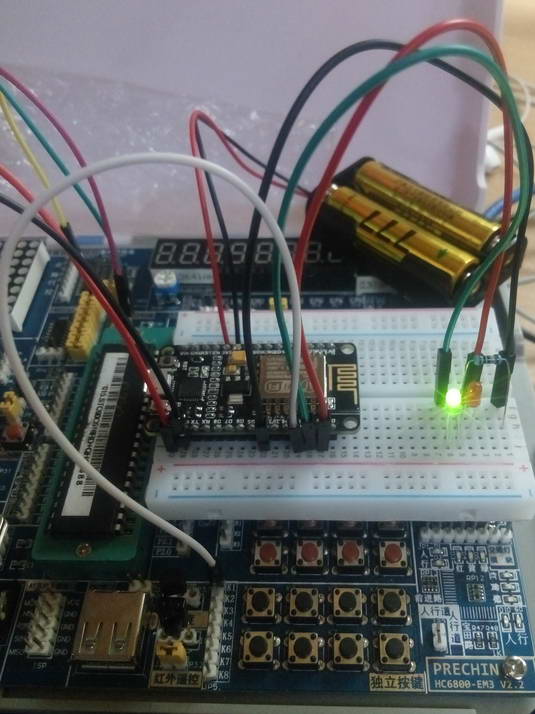
lua的面向对象 创建一个指示灯对象 lua中使用table就能创建一个对象,例如我们要在nodemcu中创建一个指示灯对象
1 2 3 4 5 6 7 8 9 10 11 12 13 14 15 16 b_led = { pin = 4 , init = function () gpio.mode(b_led.pin, gpio.OUTPUT); end , getLevel = function () return gpio.read (b_led.pin); end , turn = function (level) gpio.write (b_led.pin, ( level or (b_led.getLevel() == 0 and 1 or 0 ) )); end }
这样我们就封装好了一个指示灯对象,我们只要在开头初始化指示灯b_led.init(),然后就可以在需要的地方用b_led.turn()切换指示灯状态就行了。
1
2
3
4
_led.init(); tmr.alarm(1 , 1000 , 1 , function () b_led.turn(); end );
封装一个灯光类 如果我们想要两三个指示灯怎么办呢?当然不会把上面的代码重复三次啦,所以我们现在来写一个灯光类。
1 2 3 4 5 6 7 8 9 10 11 12 13 14 15 16 17 18 19 20 Light = {}; function Light:new (pin) local o = {}; setmetatable (o, self ); self .__index = self ; o.pin = pin; gpio.mode(pin, gpio.OUTPUT); return o; end function Light:getLevel () return gpio.read (self .pin); end function Light:turn (level) gpio.write (self .pin, ( level or (self :getLevel() == 0 and 1 or 0 ) )); end
注意这里函数用的是冒号Light:new(pin),用.和:的区别是用:的函数会传入一个self变量,稍微了解一点面向对象的同学应该都知道this, self这些关键字,代表着对象本身。Light在调用new,所以里面的self代表的不是实例而是原型Light,因此实例的属性是o.attr而不是self.attr,实例在调用下面开关两个函数的时候才是用self。
我们来让两个指示灯交替闪烁
1
2
3
4
5
6
7
8
r_led = Light:new(1 ); g_led = Light:new(2 ); r_led:turn(0 ); g_led:turn(1 ); tmr.alarm(1 , 1000 , 1 , function () r_led:turn(); g_led:turn(); end );
让灯光类从基础接口类中继承 现在我们有灯了,但是我们还需要一个按键,按键的特征也是IO口索引和状态,很明显我们可以做一个父类Basio,然后从父类中派生出Key类和Light类。Basio类
1 2 3 4 5 6 7 8 9 10 11 12 Basio = {}; function Basio:new (pin) local o = {}; setmetatable (o, self ); self .__index = self ; o.pin = pin; return o; end function Basio:getLevel () return gpio.read (self .pin); end
然后我们从Basio中派生一个Light类
1
2
3
4
5
6
7
8
9
10
11
12
13
14
Light = Basio:new(); function Light:new (pin) local o = {}; setmetatable (o, self ); self .__index = self ; o.pin = pin; gpio.mode(pin, gpio.OUTPUT); return o; end function Light:turn (level) gpio.write (self .pin, ( level or (self :getLevel() == 0 and 1 or 0 ) )); end
我们可以直接使用刚才的LED交替闪烁程序来测试,可以发现程序能正常运行。因为Light继承自Basio,所以Light的实例是可以使用Basio类的方法的。Key类
1
2
3
4
5
6
7
8
9
10
11
12
13
14
15
16
17
18
19
Key = Basio:new(); function Key:new (pin) local o = {}; setmetatable (o, self ); self .__index = self ; o.pin = pin; gpio.mode(pin, gpio.INT); return o; end function Key:on (type_, callback, delay) function onBtnEvent () gpio.trig(self .pin) tmr.alarm(6 , (delay or 500 ), tmr.ALARM_SINGLE, function () gpio.trig(self .pin, type_, onBtnEvent); end ); callback(); end gpio.trig(self .pin, type_, onBtnEvent); end
然后我们现在来写个按键切换红绿灯的程序
1
2
3
4
5
6
7
8
9
r_led = Light:new(1 ); g_led = Light:new(2 ); btn_led = Key:new(3 ); r_led:turn(0 ); g_led:turn(1 ); btn_led:on("down" , function () r_led:turn(); g_led:turn(); end );
完美运行。
本来写到这里就不想写了 链式操作 链式操作就是我们觉得一条条指令写得比较烦,这个时候使用o.a().b().c()这样的操作就会比较方便和顺眼。return self,这个时候就可以使用链式操作了。
1
2
3
4
5
6
7
8
9
10
11
12
13
14
15
16
17
18
19
20
function Light:turn (level) gpio.write (self .pin, ( level or (self :getLevel() == 0 and 1 or 0 ) )); return self ; end function Key:on (type_, callback, delay) function onBtnEvent () gpio.trig(self .pin) tmr.alarm(6 , (delay or 500 ), tmr.ALARM_SINGLE, function () gpio.trig(self .pin, type_, onBtnEvent); end ); callback(); end gpio.trig(self .pin, type_, onBtnEvent); return self ; end
这个时候就可以使用链式操作
1
2
3
4
5
6
r_led = Light:new(1 ):turn(0 ); g_led = Light:new(2 ):turn(1 ); btn_led = Key:new(3 ):on("down" , function () r_led:turn(); g_led:turn(); end );
检查接口冲突……之类功能 假如我们不小心用了同样的pin口,例如
1
2
led1 = Light:new(1 ); key1 = Key:new(1 );
妥妥的,led1没办法正常工作了,为此我们可以写一个setPin在设置接口的同时用于检查,我们将Basio类改成
1
2
3
4
5
6
7
8
9
10
11
12
13
14
15
16
17
18
19
20
21
22
23
Basio = { pinIndex = 0 }; function Basio:new (pin, mode) local o = {}; setmetatable (o, self ); self .__index = self ; o:setPin(pin, mode); return o; end function Basio:setPin (pin, mode) if (self .pin) then self .pin = nil ; Basio.pinIndex = bit.bxor(Basio.pinIndex, 2 ^self .pin); end if (pin) then if (bit.band(Basio.pinIndex, 2 ^pin) ~= 0 ) then return error ("'pin " .. pin .. " is occupied'" , 2 ); end self .pin = pin; Basio.pinIndex = bit.bor(Basio.pinIndex, 2 ^pin); if (mode) then gpio.mode(pin, mode) end ; end return self ; end
位操作需要在云构建时中添加bit模块,而且不能使用lua常规语法中的&和|,还有^表示次方而不是异或,这个有点尴尬。pin 1,2^1就是二进制10,此时pinIndex == 110,意味着pin 1和pin 2被占用了,这时候按位与的结果就是010,我们就能得到冲突的结论。pinIndex == 100,我们就可以正常的赋值给pin,然后按位或之后得到110作为新的pinIndex。Light和Key类中也要把o.pin = pin换成o:setPin(pin)
完整代码:
1
2
3
4
5
6
7
8
9
10
11
12
13
14
15
16
17
18
19
20
21
22
23
24
25
26
27
28
29
30
31
32
33
34
35
36
37
38
39
40
41
42
43
44
45
46
47
48
49
50
51
52
53
54
55
56
57
58
59
60
61
Basio = { pinIndex = 0 }; function Basio:new (pin, mode) local o = {}; setmetatable (o, self ); self .__index = self ; o:setPin(pin, mode); return o; end function Basio:setPin (pin, mode) if (self .pin) then self .pin = nil ; Basio.pinIndex = bit.bxor(Basio.pinIndex, 2 ^self .pin); end if (pin) then if (bit.band(Basio.pinIndex, 2 ^pin) ~= 0 ) then return error ("'pin " .. pin .. " is occupied'" , 2 ); end self .pin = pin; Basio.pinIndex = bit.bor(Basio.pinIndex, 2 ^pin); if (mode) then gpio.mode(pin, mode) end ; end return self ; end function Basio:getLevel () return gpio.read (self .pin); end Light = Basio:new(); function Light:new (pin) local o = {}; setmetatable (o, self ); self .__index = self ; o:setPin(pin, gpio.OUTPUT); return o; end function Light:turn (level) gpio.write (self .pin, ( level or (self :getLevel() == 0 and 1 or 0 ) )); return self ; end Key = Basio:new(); function Key:new (pin) local o = {}; setmetatable (o, self ); self .__index = self ; o:setPin(pin, gpio.INT); return o; end function Key:on (type_, callback, delay) function onBtnEvent () gpio.trig(self .pin) tmr.alarm(6 , (delay or 500 ), 0 , function () gpio.trig(self .pin, type_, onBtnEvent); end ); callback(); end gpio.trig(self .pin, type_, onBtnEvent); return self ; end
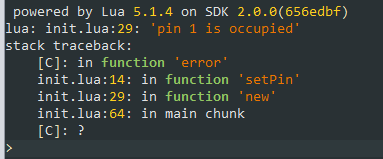
假入我们不小心使用了同一个IO口
1
2
r_led = Light:new(1 ); b_led = Light:new(1 );
控制台就会报错
这个方法同样可以用在定时器上,毕竟我们偶尔会忘记自己用过哪些定时器。
保护变量 如同JAVA里有public和private,对象里的一些属性是不应该直接暴露出来的,举个例子
1
2
3
4
5
6
7
8
9
acc = { total = 0 , add = function (n) totla = total + n; end , } acc.add(5 ); print (acc.total); // 5
在这个例子中,因为total属性直接暴露出来,于是可以任意修改total的值,甚至是acc.total = "1",很明显这会导致程序无法正常运行。要解决这个问题,我们就需要将total保护起来,只暴露出add和getTotal。
1
2
3
4
5
6
7
8
9
10
11
12
13
14
15
acc = (function () local o = {}; local total = 0 ; o.add = function (n) total = total + n; end o.getTotal = function () return total; end return o; end )();acc.add(5 ); print (acc.getTotal()); print (acc.total);
这样一来total就不能被直接修改,我们还可以添加一个检查传入参数合法性的函数,在每个操作开头执行,这样total就得到了完美的保护,不用再担心total在哪被直接修改了。
例如我们一开始的Light类可以写成这样
1
2
3
4
5
6
7
8
9
10
11
12
13
14
15
16
17
18
19
20
21
22
23
24
25
26
27
28
29
30
Light = {}; function Light:new (pin) local o = {}; setmetatable (o, self ); self .__index = self ; gpio.mode(pin, gpio.OUTPUT); local state = 0 ; local setState = function (s) state = s; end ; o.getPin = function () return pin; end ; o.getState = function () return state; end ; o.on = function () setState(1 ); gpio.write (pin, gpio.LOW); end o.off = function () setState(0 ); gpio.write (pin, gpio.HIGH); end return o; end
需要注意的是,我们一开始用的是冒号:on(),但现在我们用的是点.on(),r_led:on()和g_led:on()其实是调用同一个函数,但是因为传入的self不同导致操作发生了变化。而r_led.on()和g_led.on()调用的是不同的函数,所以能改变各自的state而不互相影响。
不过这样写的话这pin和state就没办法继承了…毕竟lua里没有真正的protected。这是最可惜的一点啊。
那么关于lua的面向对象我暂时就说那么多了,这一篇文章我写了好几天而不是一次写完,可能中间会有什么地方会出错。能说的地方还有好多,不过真心写不下去了,这次就先这样吧。
啊,好累。
真·按键控灯代码 感谢各位能够看到这里,其实这一篇文章对写nodemcu没有什么帮助,毕竟容量小内存小啊,亲测上面的代码浪费了3KB左右的内存
1 2 3 4 5 6 7 8 9 10 11 12 13 14 15 16 17 18 19 20 21 22 23 24 LED_R = 1 LED_G = 2 KEY_LED = 3 TMR_KL = 6 gpio.mode(LED_R, gpio.OUTPUT) gpio.mode(LED_G, gpio.OUTPUT) gpio.mode(KEY_LED, gpio.INT) gpio.write (LED_R, gpio.LOW) gpio.write (LED_G, gpio.HIGH) function onBtnEvent () gpio.trig(KEY_LED) tmr.alarm(TMR_KL, 500 , tmr.ALARM_SINGLE, function () gpio.trig(KEY_LED, "down" , onBtnEvent) end ) gpio.write (LED_R, (gpio.read (LED_R) == 0 and 1 or 0 )) gpio.write (LED_G, (gpio.read (LED_R) == 0 and 1 or 0 )) end gpio.trig(KEY_LED, "down" , onBtnEvent)
这里简单的说下几个gpio方法。
首先是gpio.mode,传入pin和mode参数就可以设置io口的工作模式,led当然就是输出,按键就是中断啦。
然后gpio.write,这个方法只能工作在输出模式,gpio.HIGH其实就是1,代表高电平,gpio.LOW同理。
还有gpio.trig,这个方法可以绑定一个函数,传入一个触发模式就会自动触发,例如高电平"high",下降沿"down"。
按键里面使用定时器是因为按键按下去的时候,电平下降沿会出现不止一次,不加定时器的话会触发多次按键操作。
其他关于gpio的具体用法就要自己看官方文档 了。